Getting Started
Contents
2. Getting Started#
Before you begin to read this tutorial it is recommended that you install the software that is necessary in order for you to follow along the book and experiment for yourself with our examples. This chapter contains practical information to help you set everything up so that you can make the most of this new learning experience.
This chapter was written during the second half of 2020, when the most recent Dyalog APL release was 18.0. Please bear in mind that some figures and exact instructions may become outdated. If you already have an earlier version of Dyalog APL installed, most of the examples will still work but of course we recommend that you install the latest version of Dyalog APL.
2.1. Installing the Software#
This section will contain more detailed instructions on how to set up the software you need. To get APL up and running on your machine, you will most likely need two things:
Dyalog APL: allows your computer to understand APL code and evaluate it; and
an IDE (Integrated Development Environment), because it provides a nice interface for you to communicate with Dyalog APL, the component mentioned above.
Depending on your operating system you may need to follow a different set of steps to get everything up and running, so we advise you to jump to the subsection that matches the operating system your machine is running.
If you do not wish to install any software whatsoever, you can follow along this book online (with some limitations). Skip to Section 2.2.4.
2.1.1. Microsoft Windows#
If your machine is running Microsoft Windows then you should head over to Dyalog’s download zone and download Dyalog APL from there. Once the download is complete you can unzip the archive and open the file setup_readme.htm to read more detailed instructions. If you run the installer (setup.exe) with administrator privileges then you can likely accept all installation defaults. Refer to the setup_readme.htm file if you want to understand why it is recommended that you run the installer with administrator privileges.
After the installation is complete you should have Dyalog APL installed on your computer, as well as an APL keyboard that will allow you to type APL glyphs like ⍴ and ⍷ and an IDE to support your development of APL programs.
On Windows machines this is the recommended program to use when programming in APL. You may install RIDE if you prefer to use the IDE that Linux/MacOS users will most likely run, but the classical Windows IDE that you just installed provides for a richer experience.
2.1.1.1. Installing RIDE#
If you prefer to install RIDE you can head over to RIDE’s latest release on GitHub and download the Windows executable you find there. A default installation will serve your needs.
2.1.2. Linux#
If your machine is running a Linux distribution, head over to Dyalog’s download zone and select the appropriate download with respect to your Linux distribution. After the download is complete you can install the package you just downloaded; once you do this, you can type dyalog on your command line to start a very basic terminal session. Try typing 3 + 3 and pressing Enter to see if APL returns the result 6. If it did, everything is going well.
If something went wrong or you need more help, you can refer to Dyalog’s Documentation pages. Under “UNIX-Specific Documentation” you can find more detailed instructions on how to install Dyalog APL on your system.
After Dyalog APL is installed it is recommended that you also install a suitable IDE, namely RIDE - the Remote IDE for Dyalog APL. Please refer to RIDE’s Releases page on GitHub to download and install the most recent version of RIDE.
2.1.3. MacOS#
If your machine is running MacOS then you can get Dyalog APL and an appropriate IDE with just a single installation. Head over to Dyalog’s download zone and select the MacOS package. Installing the downloaded package on your machine should give you access to RIDE - the Remote IDE for Dyalog APL.
If you run into trouble installing the software or you need more help, please refer to Dyalog’s Documentation pages. Under “MacOS-Specific Documentation” you can find more detailed instructions on how to install Dyalog APL on your system.
2.1.4. Jupyter Notebook Kernel#
This subsection points you to the right pages if you wish to install the Dyalog APL kernel for Jupyter notebooks. If you are a first time APLer or are inexperienced with programming we recommend you skip this for now, as you won’t really need it. Jupyter notebooks allow for a different programming experience and are very suitable for intertwining code snippets and text, like this book does. If you just want to follow along the examples in the book you do not need to install this, as a standard APL interpreter session will be enough.
The Dyalog APL kernel can be found on GitHub and the appropriate installation instructions can be found in the wiki pages, along with all the dependencies that are needed. Be sure to have a working Dyalog APL installation before trying to install the Dyalog APL kernel.
2.2. First Contact#
In the subsections that follow we will explain the most basic fundamentals about the environments you can use to program in APL. We will teach you just enough so that you can hit the ground running when we start exploring APL in the “Data and Variables” chapter.
2.2.1. The RIDE Working Environment#
When you start up RIDE you should be greeted with a loading screen that looks similar to this:
Fig. 2.1 RIDE’s loading screen.#
After loading is complete RIDE will open a configuration window for you to connect to Dyalog APL. Depending on your platform you may or may not be greeted by a screen like the one below.
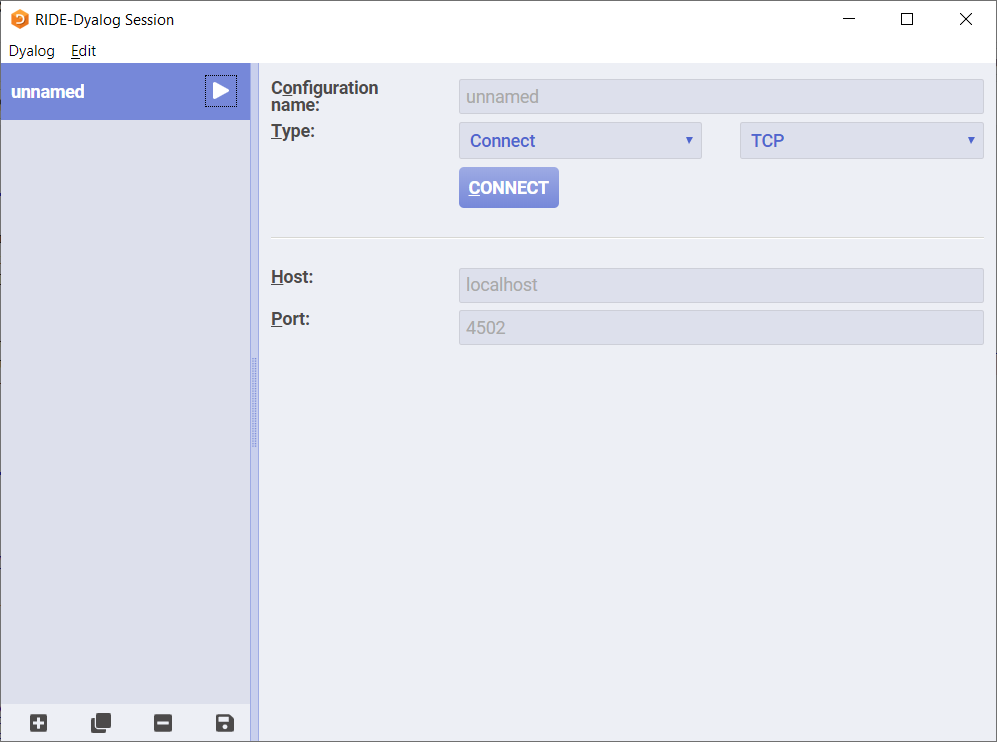
Fig. 2.2 RIDE’s connection screen.#
If you see a screen like this, open the dropdown where “Connect” is and change it to “Start”, so that instead you see a screen like the one in the figure below.
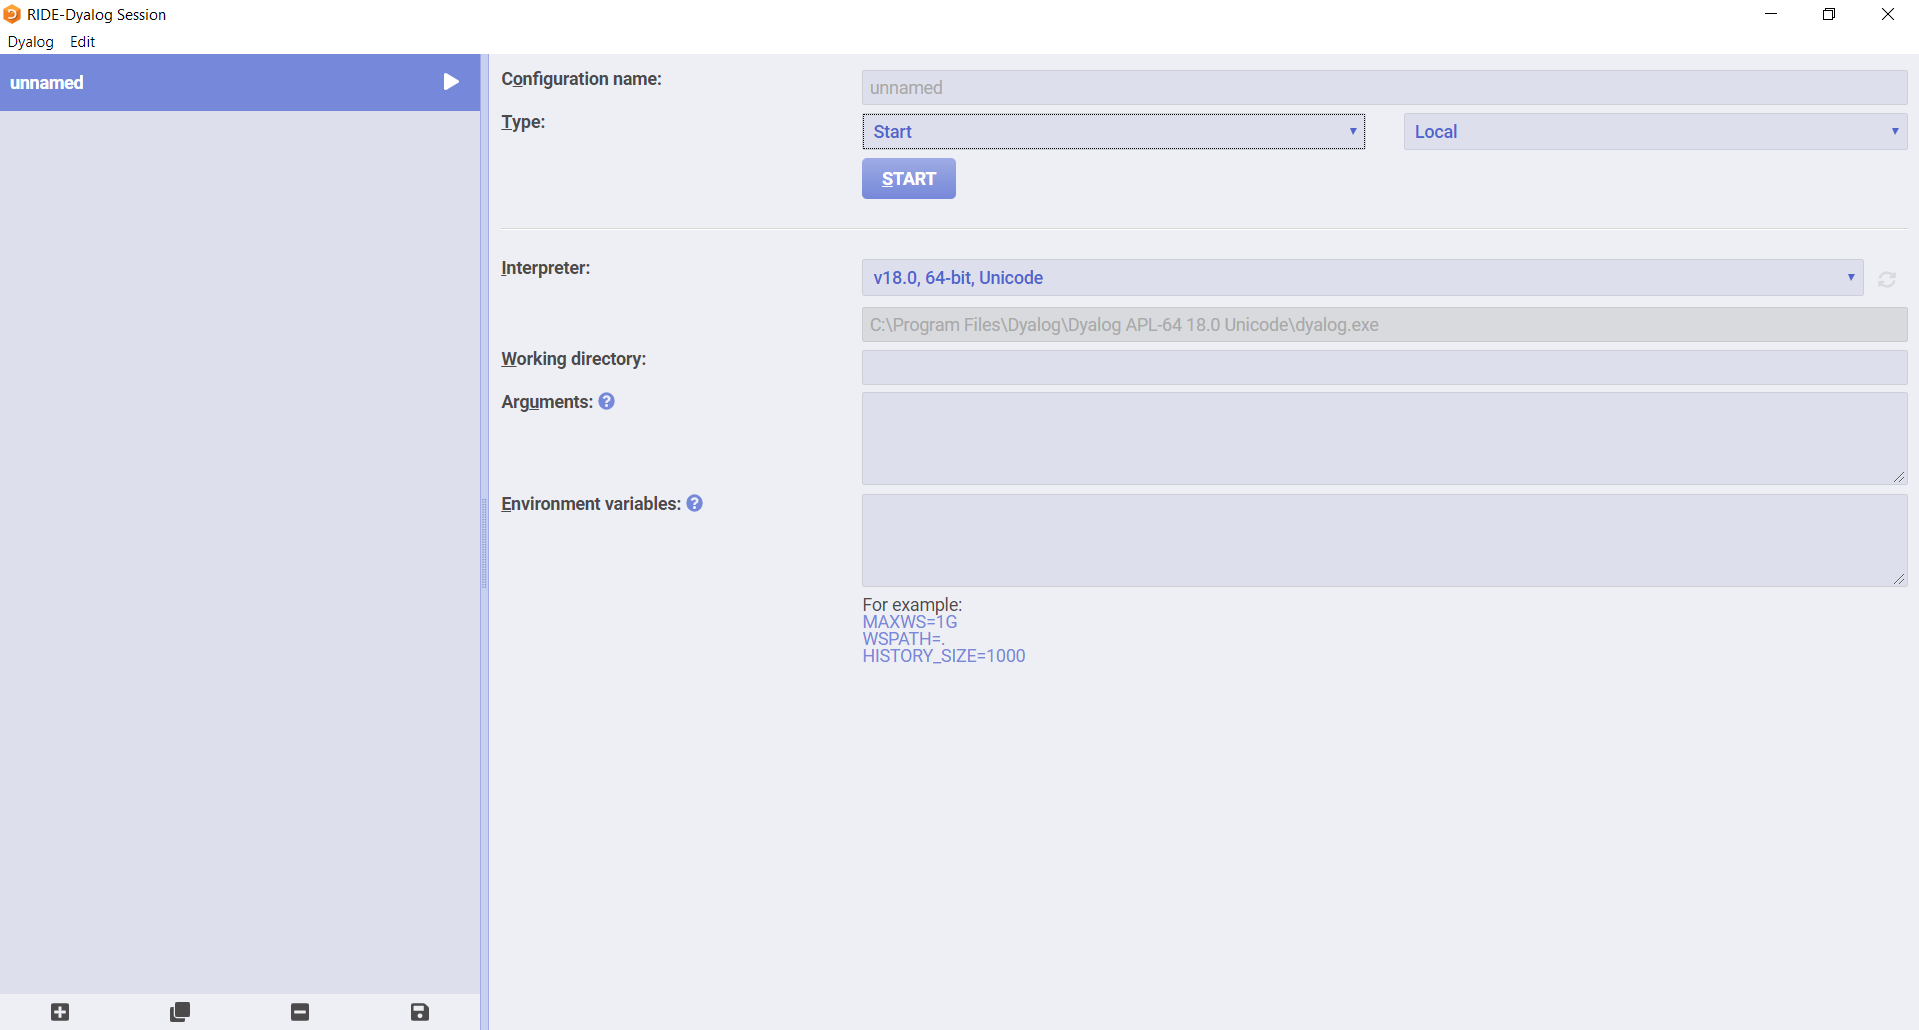
Fig. 2.3 RIDE’s start screen.#
You can then press “Start” to open an APL interpreter session like the one in the figure below. If you didn’t see the screens above then you should already be in the APL interpreter session:
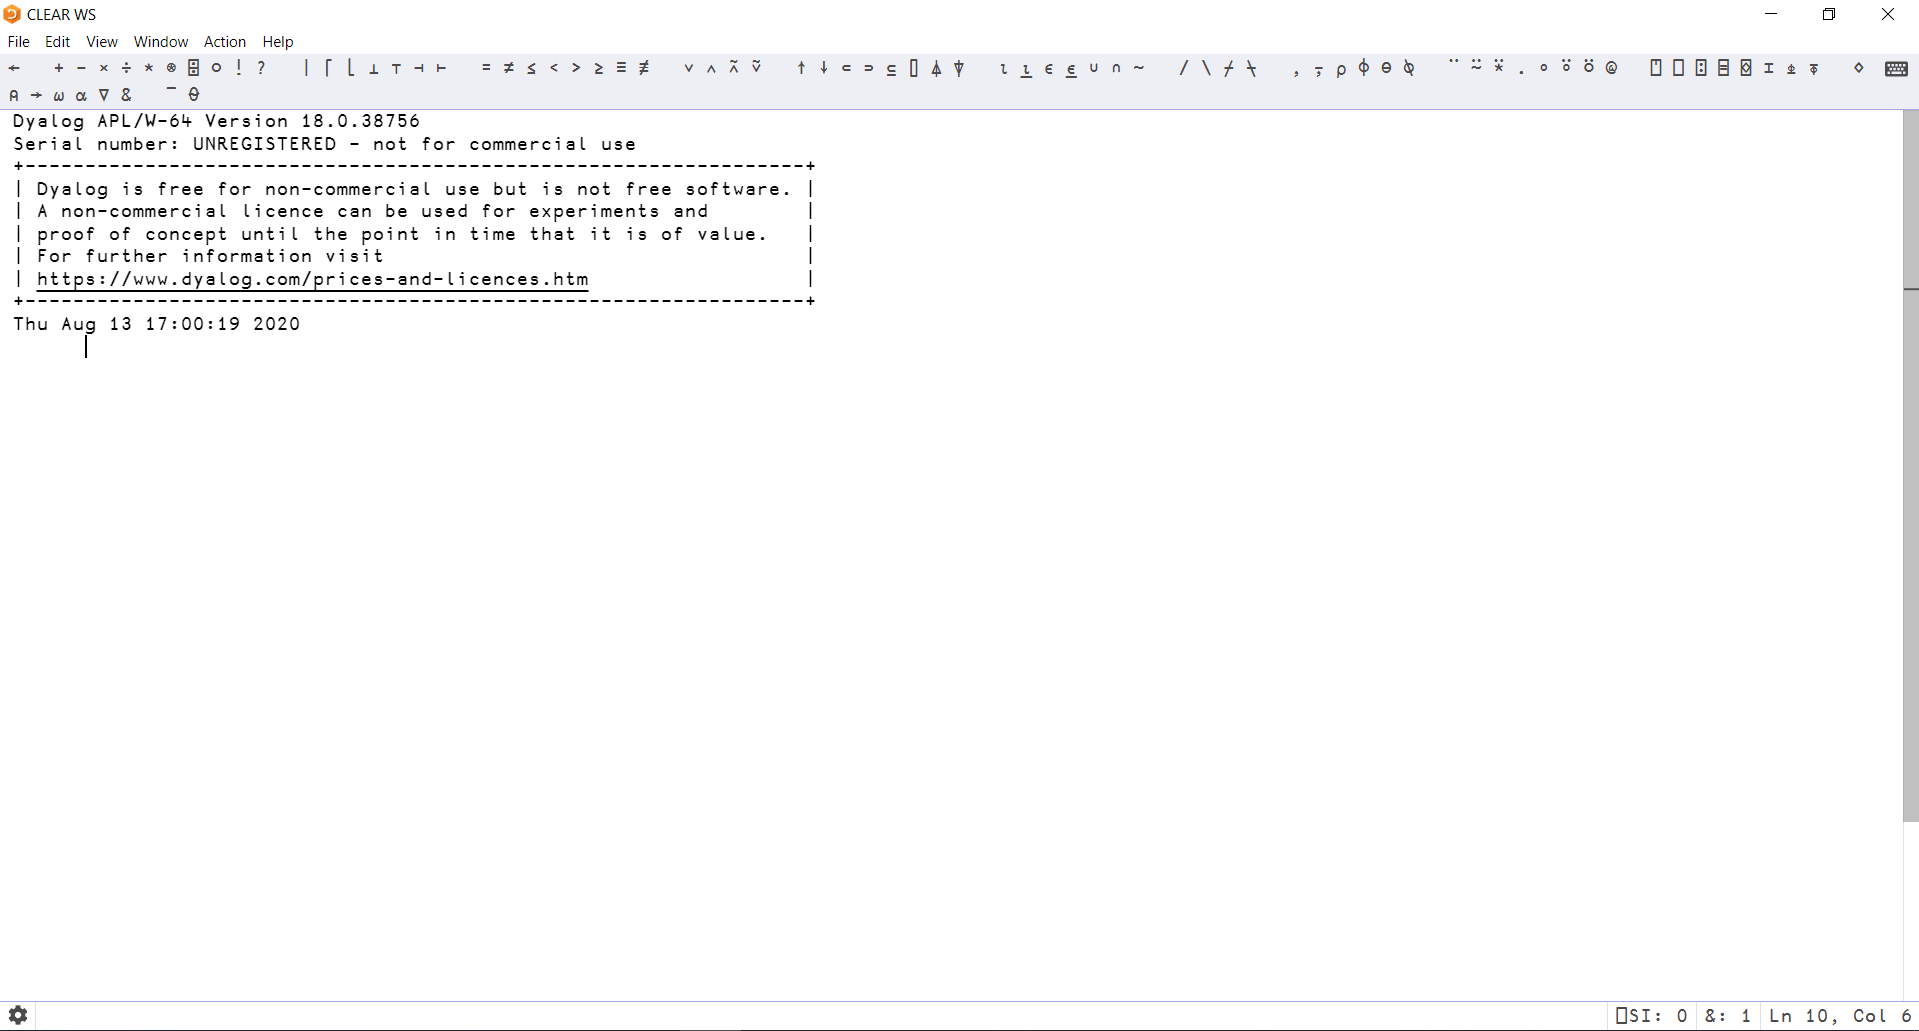
Fig. 2.4 RIDE’s interpreter screen.#
Try typing 3 + 3 and hit Enter. If the program prints a 6 below your input then all is good. The RIDE window contains, from top to bottom,
a menu bar, which you can use to access your configuration settings, open files, quit the RIDE, etc (depending on your OS and/or system settings, this may be located at the top of your screen rather than being part of the RIDE window);
a language bar, which will be described in more detail Section 2.2.5.1;
an empty working environment (which should not be empty by now, as you typed
3 + 3in it) where you can type APL expressions and get them executed; anda status bar containing some indicators and diagnostic information.
The four sections described are highlighted in red in the figure below, respectively from top to bottom.
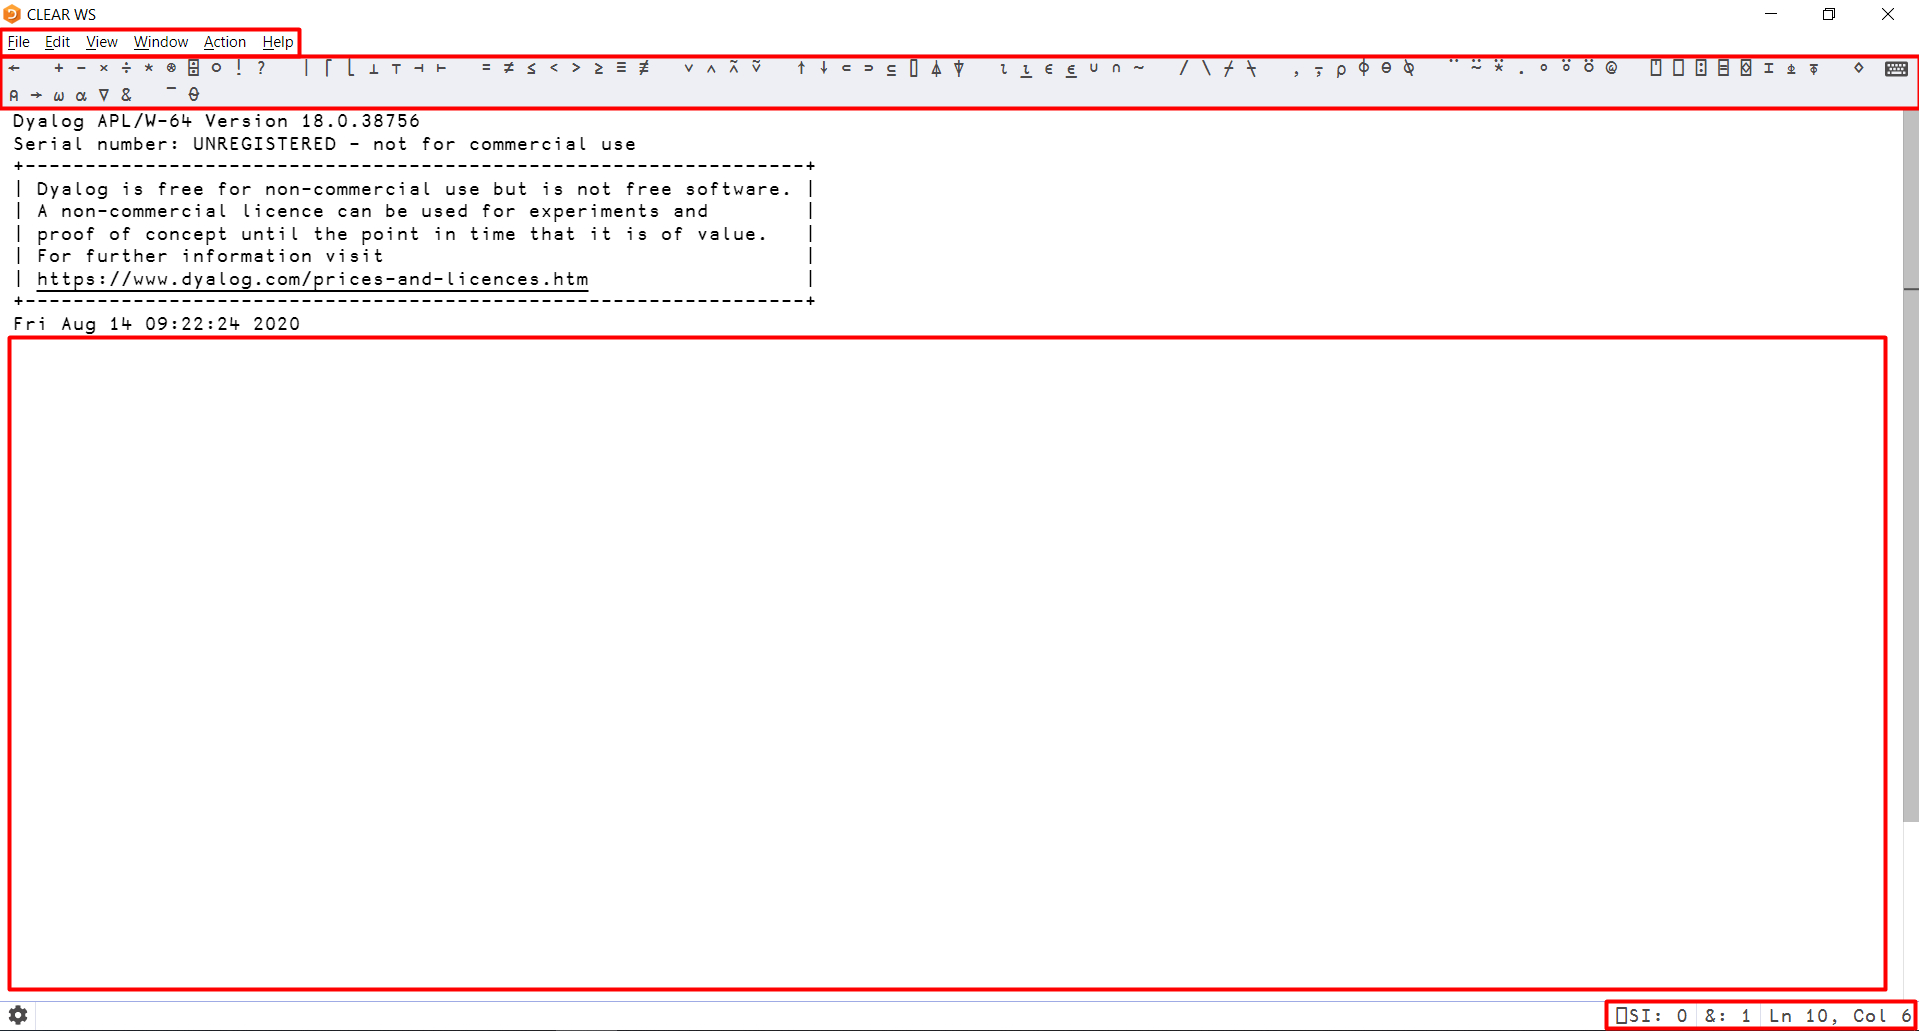
Fig. 2.5 RIDE’s working environment with the four sections highlighted in red.#
2.2.2. The Standard Microsoft Windows Interpreter Working Environment#
After installing Dyalog APL on your Windows machine, try firing up the Dyalog APL interpreter, which should open something like this:
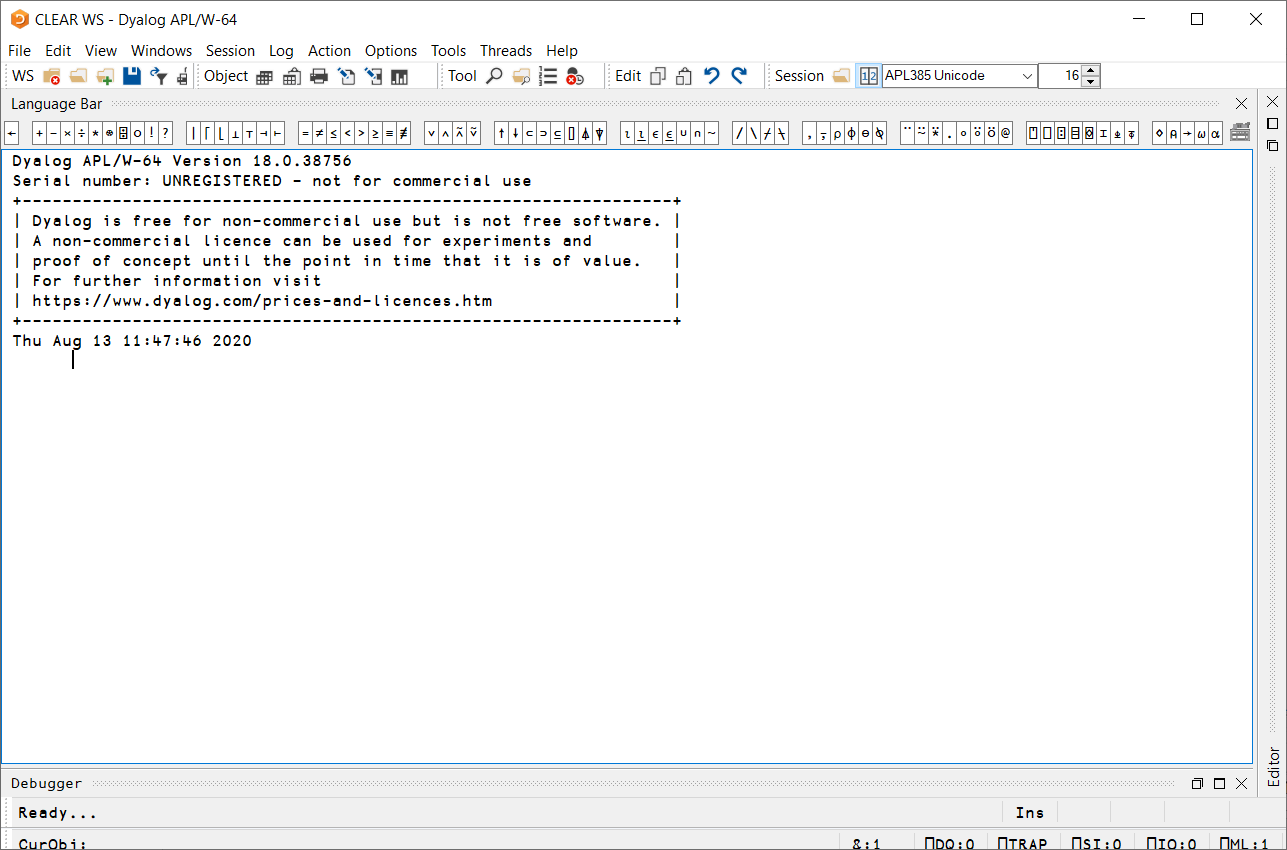
Fig. 2.6 Windows IDE interpreter.#
Try typing 3 + 3 and hitting Enter to see if the interpreter prints a 6 in response.
Having performed the installation without changing the default values, Dyalog APL will also have installed one or more APL compatible keyboard layouts. Depending on your machine, Windows may have switched to any of them automatically when you opened the interpreter, but in any case you can use ⊞ Win+Spacebar to cycle through the keyboard layouts you have active on your computer.
As an example, I only had one language and one keyboard layout active on my Windows machine - US English - and after performing the default installation, the task bar shows two keyboard layouts:
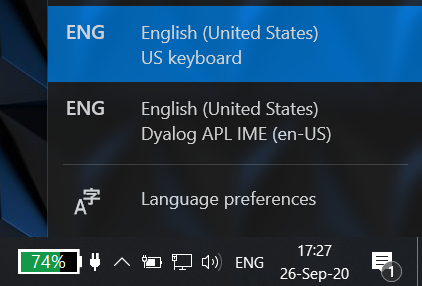
Fig. 2.7 US Dyalog IME keyboard is installed along the default US keyboard.#
The “Dyalog APL IME (en-US)” layout was installed because I had a US layout active at the time of the installation. For each keyboard layout you have set, Dyalog APL will attempt to install the respective IME layout. Uncommon keyboard layouts may have no corresponding IME layout. Please pay special attention to the Section 2.2.5 if this is the case for you.
When you open the standard windows interpreter, your development environment contains the following sections, from top to bottom:
a menu bar, that you can use to open files, configure the IDE, quit the interpreter session, etc; the menu bar is explored in detail in Dyalog’s help pages, under “UI Guide ⇨ Session MenuBar”;
a toolbar with icon shortcuts for common actions you might want to perform;
a language bar, which will be described in more detail in Section 2.2.5.1;
an empty working area (which should no longer be empty if you did the
3 + 3test) topped by an automatic message with some information on your system, like the Dyalog APL version installed, its serial number and the current date; andtwo status bars containing some indicators and diagnostic information.
The sections just described are highlighted in red in the figure below, from top to bottom respectively.
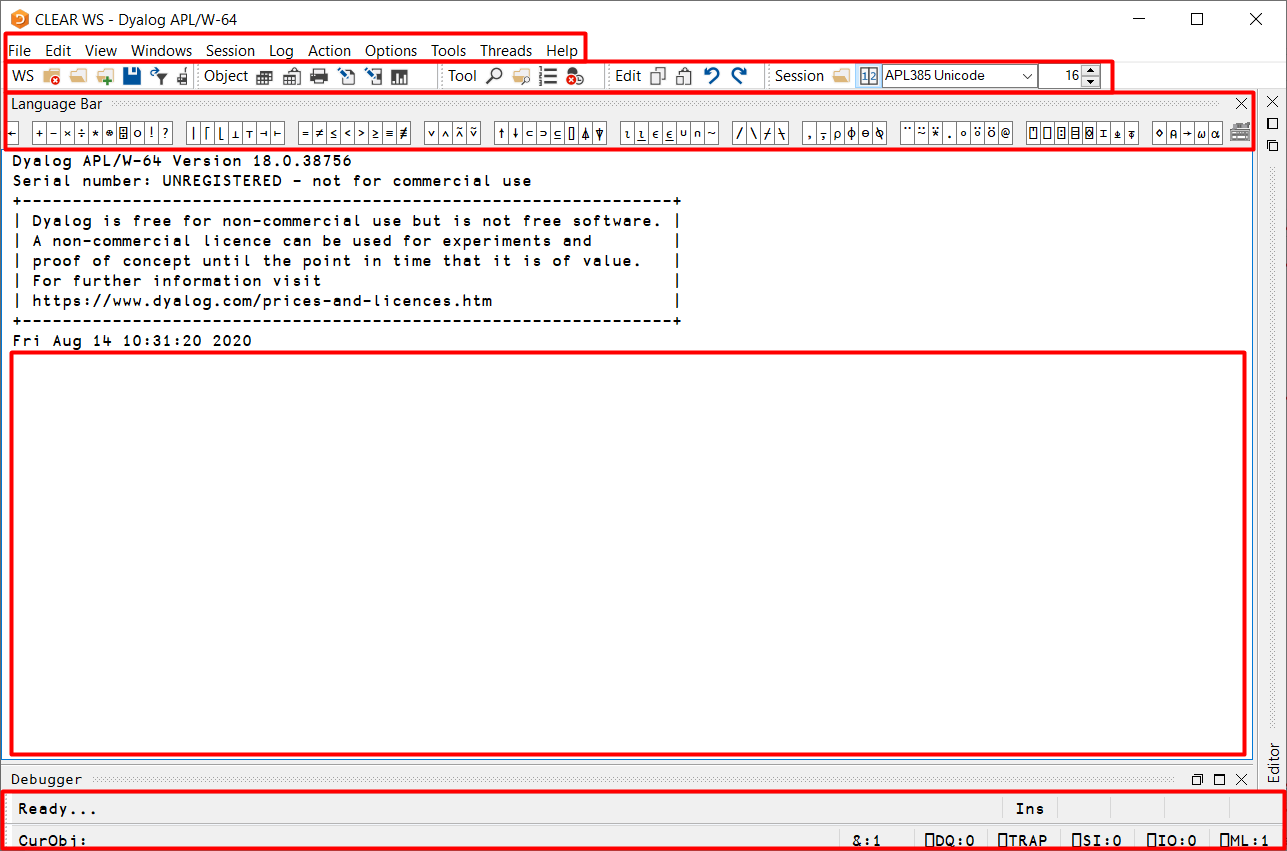
Fig. 2.8 Windows IDE default interpreter sections.#
2.2.3. The Dyalog APL Jupyter Notebook Working Environment#
After successfully installing the Dyalog APL Jupyter kernel, you can fire up the Jupyter notebook server as usual, which should open a browser window like the one in the figure below.
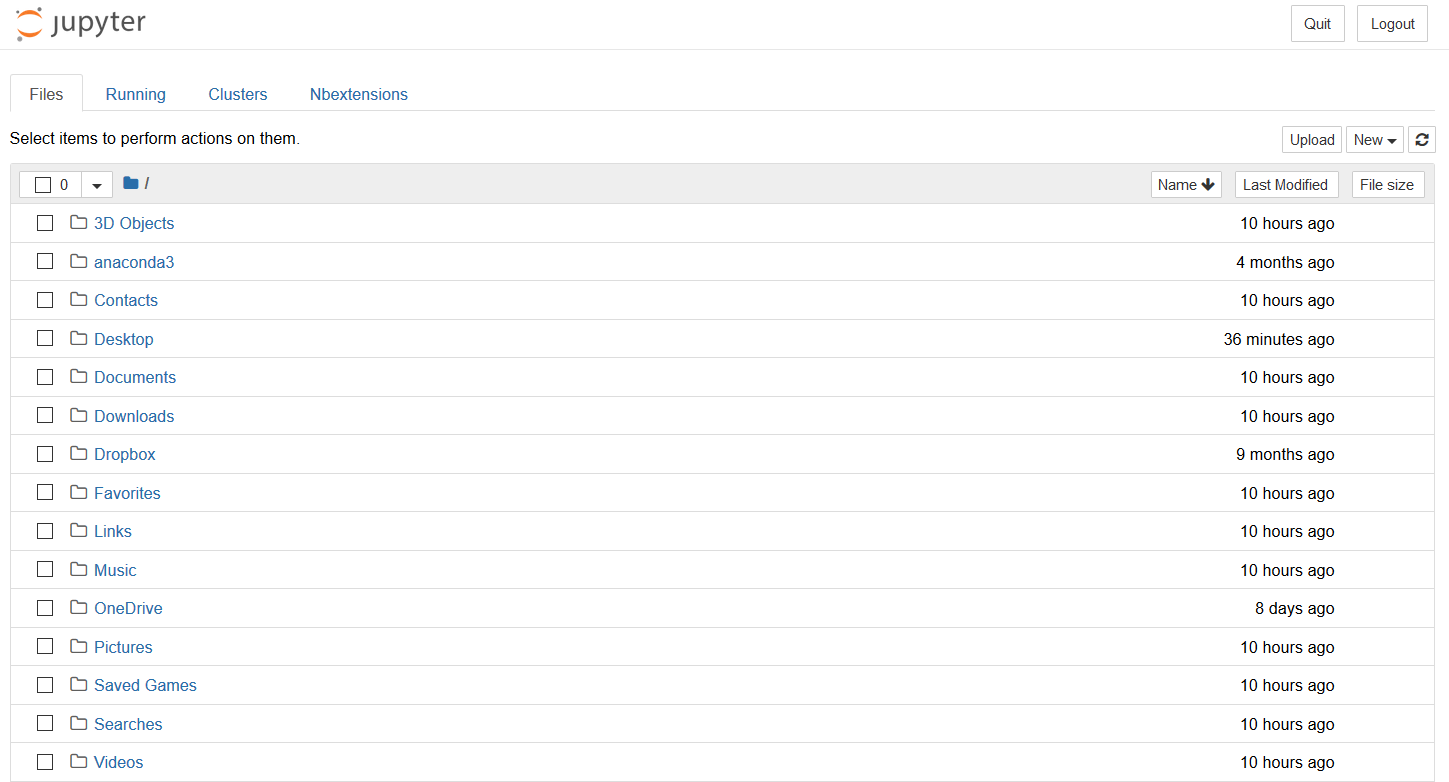
Fig. 2.9 Jupyter’s main window.#
From there you can navigate your file system as per usual and if you click the “New” button on the right, it should open a dropdown list with a couple of different options, “Dyalog APL” being one of them.
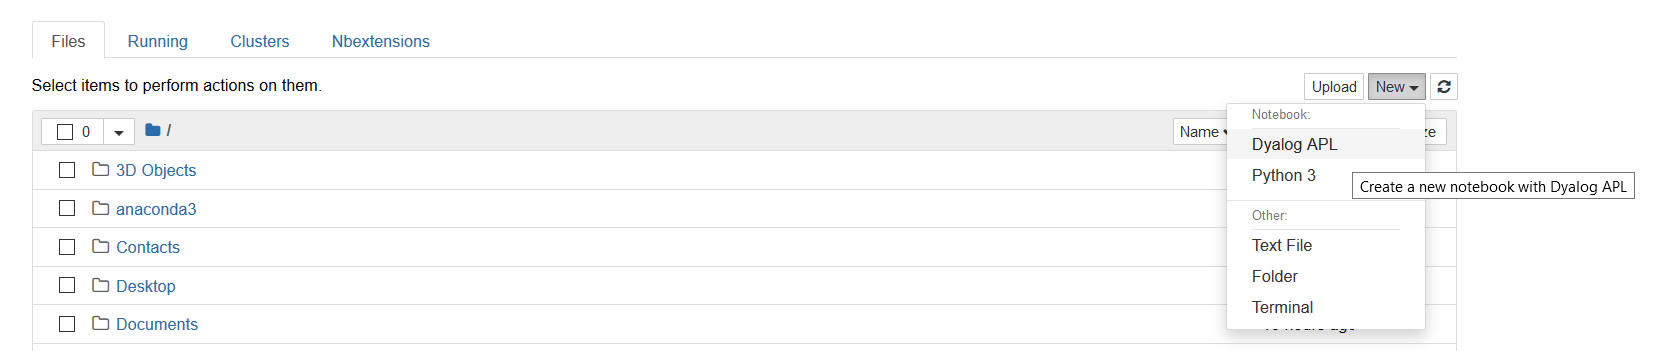
Fig. 2.10 Dropdown list to choose the Dyalog APL kernel.#
If you press that option, an empty notebook will be created, as shown in the figure below.

Fig. 2.11 Empty Dyalog APL notebook.#
When inside a notebook, you can look at the top right corner to see if it is a Dyalog APL notebook or any other notebook. If it says “Dyalog APL” just below the “Logout” button, then it is a Dyalog APL notebook. If it says anything else, like “Python 3” or “Lua” then it is a different notebook.
Try typing 3 + 3 inside the empty rectangle that shows and press Ctrl+Enter. A 6 should be printed just below the expression you typed.
The Jupyter notebook development environment is significantly different from the RIDE and the Windows IDE, being much poorer in some aspects but providing for a richer experience in other things. From top to bottom and left to right, you can find
notebook information, like its name and the last time it was saved;
the logout button to close the connection to the Jupyter server;
the menu bar;
kernel status and information;
a toolbar with icon shortcuts for some common actions (the icons you have might differ from the ones in the figure above); and
an empty working area (which should no longer be empty if you did the
3 + 3test) which expands as you work in it.
If you are unfamiliar with how Jupyter notebooks work in general, we recommend you read more about them at the Jupyter website.
2.2.4. Following Along Online#
If you want to follow along online, your best two options are
to read this book in its interactive version; and
to use TryAPL’s “Learn” functionality that allows you to link to a Jupyter notebook (like the chapters of this book) and to run the expressions. Please bear in mind that TryAPL only supports a subset of the APL language.
2.2.5. Typing APL glyphs#
As you may have understood by now, APL uses a varied set of Unicode glyphs to represent many built-ins. A standard keyboard cannot type those symbols, so the installation you made provided you with the means of typing APL glyphs.
2.2.5.1. The Language Bar#
One way of inputting APL’s glyphs is through the language bar your IDE has. On the standard Windows interpreter the language bar looks like this when unfolded:

Fig. 2.12 Windows IDE language bar.#
The RIDE will have a similar-looking language bar.
The language bar contains all the APL glyphs and also provides some summary information on them, like their name, the keyboard shortcuts you can use to type them and basic usage examples. To access this summary information, you can hover over a glyph and a tooltip will appear. The figure below shows the complete tooltip that appears if you hover .. Do not worry if you understand nothing of what the tooltip is saying, that is why you are reading this tutorial.
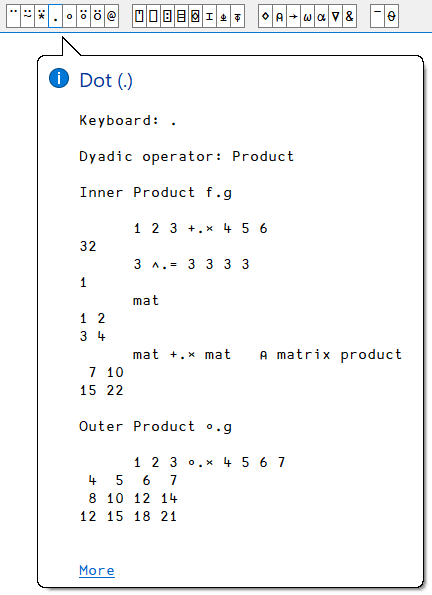
Fig. 2.13 Windows IDE . (period) tooltip.#
Inside the respective program, pressing a glyph in the language bar will place it in the position your cursor is at, so that is the most basic way of inputting APL glyphs. The recommended way, which we advise you to get used to and that we explain next, is by using the appropriate key bindings:
2.2.5.2. The APL Key#
It should come as no surprise to you that by pressing your keyboard keys, you type the symbols the key caps have printed on them. For example, the a key types an a when you press it, and if you press Shift+A you type an A. With APL we introduce another “shifting” key so that the same key can be used to produce even more symbols. We will refer to this shifting key generally as APL, because this APL key can differ depending on the keyboard layout you are using, your operating system and other programs you may have installed.
If you already know what your APL key is, you can verify everything is working as expected by pressing APL+r: a ⍴ should be typed, the Greek letter Rho.
If you do not know which one is your APL key, we will find out together.
If you are using RIDE, then chances are you are using ` as a prefix-key. What this means is, to have a ⍴ printed you first hit `, which will print a ` in your cursor position, and then you hit R, which will replace `r altogether with ⍴. It also means you can hit ` ` and then type to input a glyph by its name. If you hover an APL glyph on the RIDE language bar it will open a tooltip which, at the top, tells you the keyboard combination you need to press in order to type the given glyph. The figure below shows the tooltip for ⍴:
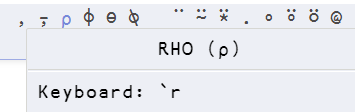
Fig. 2.14 RIDE tooltip for ⍴.#
If you are using the standard Windows interpreter and if you accepted all the installation defaults, then Windows tried to install a keyboard layout that will let you type APL glyphs anywhere, not only inside the APL interpreter. This (or these) layout(s) will have their names start with “Dyalog APL IME”. For those, your APL key is likely to be one of Ctrl or Alt. To make sure, you can either try the Ctrl+r and Alt+r combinations to see which one types a ⍴, or you can hover the glyph ⍴ in the language bar and look at the top of the tooltip that appears, which also gives you instructions on how to type the given glyph. The figure below shows the tooltip for ⍴:
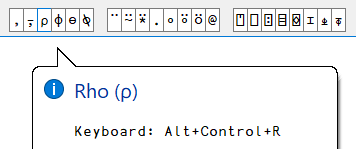
Fig. 2.15 Windows IDE tooltip for ⍴.#
In my specific case it says my APL key is, in fact, the combination Ctrl+Alt or, equivalently, AltGr. That is, if I press AltGr+r then I type a ⍴.
If you need further help with typing APL glyphs you can refer to the APL Wiki page on “Typing Glyphs”.
2.2.5.3. The AltGr Unified Keyboard#
An alternative keyboard you may want to consider installing is @abrudz’s unified AltGr keyboard. Available at the kbd GitHub repository, the layouts provided in that repository “facilitate typing Dyalog APL in that they provide easy access to all Dyalog APL symbols and allow the typing of all valid Dyalog APL identifiers”. These layouts use AltGr as the APL key.
2.2.5.4. Keyboard Layout Glyph Mapping#
Depending on your physical keyboard layout, different APL symbols may be mapped to different keys. Below we use some APL incantations to show what symbols are mapped to what keys in a standard US keyboard:
)copy dfns notes.keyboards
18↑k↓⍨¯1+⊃⊃⍸'Dyalog APL/en-US keyboard'⍷k←⎕fmt keyboards
Each key in the figure above is divided in four areas: bottom left, top left, bottom right and top right. On the left you have the standard symbols you already know how to type in your keyboard. On the right, you have APL glyphs. Let’s focus on the E key. If you look at the bottom right you can see the glyph ∊, which you can type with APL+e. Likewise for all other symbols that are on the bottom right corner of its key cap.
If you look at the top right corner of the E key, you can find the ⍷ glyph, which is accessed with APL+Shift+E. Likewise, all glyphs that appear on the top right corner of its key cap are accessed with APL+Shift and the corresponding key.
The figure above is relevant because when we introduce new glyphs in the book, we will tell you which key combinations to press but those may not work if your layout is different. As an example, if you look at the figure displayed above, you can see that inside the rectangle for the key A is the Greek letter Alpha ⍺. Because it is on the bottom right of the key cap, you can type it with APL+a. However, if you look at the French AZERTY keyboard displayed in the figure below, you will see that ⍺ is in the same physical position but inside a different key, Q in this case.
)copy dfns notes.keyboards
18↑k↓⍨¯1+⊃⊃⍸'Dyalog APL/fr-FR'⍷k←⎕fmt keyboards
Throughout this book we will assume you are using a US or UK keyboard layout when telling you which keys to press to type specific glyphs. If you are not, you can refer to this help page for more layout mappings and for Mac laptop-specific layouts.
2.2.5.5. Typing Glyphs Online or In-browser#
If you need to type APL glyphs online or in your browser and you don’t have an APL keyboard installed on your machine, you can go to Section 2.2.5.1 if you haven’t yet, as most of the information there applies to this in-browser language bar.
2.3. The APL Session#
2.3.1. The Workspace Concept#
In APL, a user is given an area of memory, the workspace, in which they can define variables, functions, among other things. When the workspace is saved, everything the user defined is saved together in a single file, in the same way as, for example, a spreadsheet saves its values and its formatting.
In the following pages, you will be invited to create variables, write functions and test for yourself how the symbols work.
To relieve you of the task of entering data for your trials, most of the variables and programs used in this book are either short or easily recreated.
2.3.2. The APL Session Log#
As you type APL expressions, RIDE and the Windows IDE save your session log. The session log is composed of every single line you enter (your inputs) and the results the program gives you (the outputs). You can scroll back in that log and re-execute a line by putting your text cursor in that line and pressing the Enter key.
In fact, you can execute several lines from the session log in one go. To mark a line for execution, you just have to change it in some may. You can make a real alteration, or a cosmetic change that has no material effect on the expression to be executed, like pressing Spacebar at the end of the line. As soon as you make any sort of modification to the line, the colour of the text will change. You can undo a change and restore a line to its original state by pressing Shift+Esc.
To execute the marked lines press the Enter key. They will be executed from top to bottom, not in the order you selected them. Note, however, that if an expression generates an error, the remaining lines will not be executed. It is also worthwhile mentioning that if you go back to an expression to modify it, when you rerun it with Enter the entire expression will be copied to the bottom of the log instead of being modified in place. This allows you to always know what you typed in what order.
The session log is not limited just to the current session, and you can scroll back to retrieve expressions and results from previous sessions, limited only by the size of the log. This is specified in “Options” ⇨ “Configure…” ⇨ “Session” ⇨ “Logs and Buffers” for the Windows IDE and “Edit” ⇨ “Preferences” ⇨ “General” ⇨ “Session” for RIDE.
You can also scroll back in the log and permanently delete part of it (for example a large block of unwanted output). Select the part to remove and press Ctrl+Delete.
2.3.3. The Input Buffer#
In addition to the session log (which contains a scrollable record of both input and output), the Windows IDE and RIDE retain the expressions that you have entered in a separate input buffer.
This allows you to recover the lines you have previously executed as follows:
to scroll back press Ctrl+Shift+Backspace; and
to scroll forward press Ctrl+Shift+Enter.
Once you have retrieved the statement you want to re-use, you can modify it (or not) and press Enter to re-execute it.
2.3.4. Auto Complete#
To alleviate the chore of typing long names (of variables, functions, files, …), the RIDE and the Windows IDE can pop up a list of existing names beginning with the same initial character(s) as you type. This feature is called auto complete and is enabled, disabled and configured:
in “Options” ⇨ “Configure…” ⇨ “Auto Complete” if you are using the Windows IDE; or
in “Edit” ⇨ “Preferences” ⇨ “General” ⇨ “Contextual help” if you are using RIDE.
To choose a name from the pop-up list, use the Up and Down cursor keys. To confirm the name that is currently selected press the Right cursor key (the right arrow). To close the suggestion list just press Esc.
In RIDE, the auto complete feature can also help you type glyphs. If you know the name of a glyph, you can enter `` and start typing the name of the glyph, that RIDE’s auto complete feature will try to suggest the appropriate glyph. For example, if you press ` ` A L P (because you want to input the Greek letter ALPha) then RIDE would show you a suggestion list similar to the one shown in the figure below.
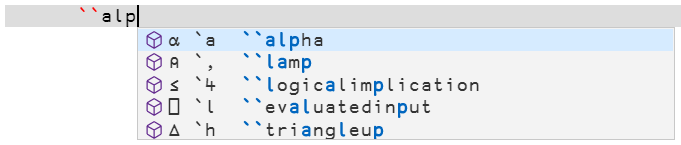
Fig. 2.16 Screenshot of RIDE’s auto complete trying to suggest the glyph for alpha.#
If you are using the Windows IDE and the Dyalog APL IME keyboard layout, you can also enable this feature by going to “Options” ⇨ “Configure…” ⇨ “Unicode Input”, then selecting the appropriate Dyalog APL IME keyboard your are using and pressing “Configure Layout…” to open a configuration window. In there, you can enable the usage of ` as a prefix-key.
2.3.5. Other Auxiliary Materials#
In this tutorial we shall also use the following associated files. Download them too from the https://www.dyalog.com/mastering-dyalog-apl.htm page (or get the zip directly from this link):
For the chapter about File processing:
cellar.dcfreport.txtmlk.txtnums.fun
For the chapter about the OLE interface with Excel:
xldemo.xlsworldsales.xls
For the chapter about SALT script files:
demoscript.dyalogtelefon.dyalogtest.dyalogteton.dyalogexperiment.7.dyalog
An additional utility workspace
Utils.dws.
2.4. Working with This Tutorial#
This tutorial is divided into several chapters, each chapter covering a major subject. Each chapter is further divided in sections and subsections that help encapsulate narrower topics for someone who knows exactly what they are looking for.
At the end of most chapters you will find a “Specialist’s Section” containing advanced discussions about the symbols or methods presented in the chapter. Because these topics are for more experienced readers, they may use symbols that are not explained until later in the book.
If you are a beginner, feel free to ignore those sections and skip to the next chapter, or at least don’t feel demotivated if you don’t understand everything that is covered in those sections.
While reading the book, reproduce the given examples on your computer and experiment by yourself using different data; you will learn more from your own experiments than from reading our examples.
Most chapters also include exercises; some are very simple and some are more complex. We recommend that you do try to solve as many exercises as possible. Compare your solutions to the ones we suggest by the end of the chapter. APL is so rich that there may be several good solutions to the same problem. Comparing different solutions is always interesting.
After the “User-Defined Functions” chapter you will be able to write small functions of your own and you may want to print some results, input data using the Graphical User Interface (GUI) or read data from files. These topics are presented in self-contained dedicated chapters, so do not hesitate to go back and forth in the book to read about the features you need.
Also have a look at the workspaces shipped with Dyalog APL, which are documented at Dyalog’s Documentation Centre. Dyalog also has additional resources available on GitHub.
This document is only a tutorial; everything cannot be said in these pages and there is plenty of additional information out there:
the Documentation Centre and Help pages for the most recent Dyalog APL version containing several manuals:
User Guide -
installation and configuration of APL;
the working environment described in detail;
utility workspaces and tutorials delivered with Dyalog APL;
APL files;
… and some advanced topics.
Language Reference -
describes all the symbols used in the language;
describes the structure of a program;
describes all the System Commands; and
gives basic information about Object-Oriented Programming.
Interface Guide -
introduction to the Graphic User Interface (GUI) with examples;
APL and the Internet;
OLE automation client & server; and
ODBC interface with SQL Data Bases.
Object Reference -
overall description of all objects, properties, methods and events used by the GUI interface.
.NET Interface Guide -
using the Microsoft .NET Framework.
specialised booklets on more advanced topics, available at this webpage;
the APL Wiki, powered by the whole APL community, with hundreds of articles on everything related to APL;
and many more…